Craftwerx Studio Fabric Funhouse


Craftwerx Studio Fabric Funhouse

Craftwerx Studio
is a retailer of quality pre-cut quilting fabrics currenlty in squares, kits & stash packs.

We also sell embroidery silks, rayons & cotton to personalise your work and design our own
Weekend Quilting Project Kits & SUDOKU puzzle quilt kits which are great gifts.

I'm Teesha Morgan and this is my blog!

Showing posts with label quilting kit. Show all posts

Friday, February 18, 2011

Big Block Quilt Pattern - What to do with your beautiful Fat Quarter Pack

So your beautiful Fat Quarter pack has arrived in the mail, what do you do with it?

Some of you have a project in mind, but some of you just put it in your stash until you work out what to do with it.

Easy Big Block Quilt

This is a quick and easy quilt for you to make.

Pick 3 fabrics for your blocks and 1 for a border you will also need one of your stash fabrics for the backing or another set of 4 FQs to repeat the quilt top for the backing.

Cut the border FQ into 2" strips.

Cut each of your 3 block FQs into 4 blocks, do this by folding your FQ in half and iron it, now fold your piece in half again and then iron. Now open up your FQ and cut along the creases. Voila! you have your blocks. Repeat this with each of your 3 blocks.

Now arrange your blocks in a pleasing pattern.
I used
1 2 3
2 3 1
3 1 2
1 2 3
Sew your blocks together one row at a time using a .5cm seam allowance and finger press the seams out.

Sew your rows together.
Iron your sewing,

Now place your borders around the edges until you are satisfied with the pacement of joins. Join the fabric strip to make 4 large strips that match the quilt ie top, bottom, left, right.

Begin with the top and pin your border strip to your quilt right sides together, leaving 3" each side of the quilt. Sew.
Repeat with the bottom.
Now do the same for each side.
Finger press out your seams and then iron your work.

Fold back your top and bottom border and pin it across your side borders at right angles.
Pin both sides and make sure that they line up BEFORE you sew(or you will be doing some un-picking)
Once they are lined up, sew them together carefully.
Now iron your quilt top and you have finished the piecing.......... isn't it quick and easy!

Decide what you are going to use for batting whether it be bought or upcycled batting and
cut it to size and either bast or pin it to your top.

If you are a quilt before binder, now it the time to do your quilting.
This simple pattern means that you can do just about any quilting that you like, it will look great with simple in or beside the ditch, stripes or the most complicated quilting pattern that you can imagine!

If you are a bind then quilt then here is the no bind method that we are using for this quilt.

Put your quilt top with the batting attached down face up and then lay your backing piece on top, right sides together.Pin around the edge leaving a 1cm seam allowance but leave the middle of the bottom open about 15cm.

Sew the two sides together securely, you may want to use a double stitch line or an overlocker. REMEMBER to leave that gap at the bottom to turn your quilt through!
Now once you are done, reach inside the gap and very carefully pull your quilt through to turn the whole thing the right side out.
Now all you have to do is carefully sew up the gap, just like a cushion!

Remove and pins and Voila!

Your quilt is done or.... now you can do your quilting depending of whether you did it before or not.

I have some great Fat Quarter bundle in store http://www.craftwerxstudio.com/
in the Fat Quarter Bundles section at the moment that work brilliantly with this pattern, so I have added a few pics of them below.

It seams to be raining over the entire of Australia this weekend, so now you have something to do!


Happy Studio E


Chou Butterflies by Kona Bay

Fandango from Henry Glass and CO

Acorn for Timeless Treasures

Saturday, October 2, 2010

Quilted Headband Pattern Pt1

©2010, Craftwerxstudio. This pattern courtesy of http://craftwerxstudio.bogspot.com
You may freely reprint this article on your website or in your newsletter provided this courtesy notice and the author name and URL remain intact.

Free Quilted Headband Pattern Pt1
As promised, here is the pattern for my headbands. As there is a lot to type, I am going to type this over a few different posts.
This pattern is made using 2x 1" strips and 1x 2" strips but there are many variations including using 17 x 2.5" squares, 1 x 2.5" strip and 5 x 1/2" strips.
All Headband kits bought from my eBay store will include the appropriate instructions as well as all of the bits and pieces needed to make the project. Each headband takes about 3 hours to complete including the embroidery so they are a great project for on the bus, in the car or waiting for the kids at sport!
So on to the pattern!

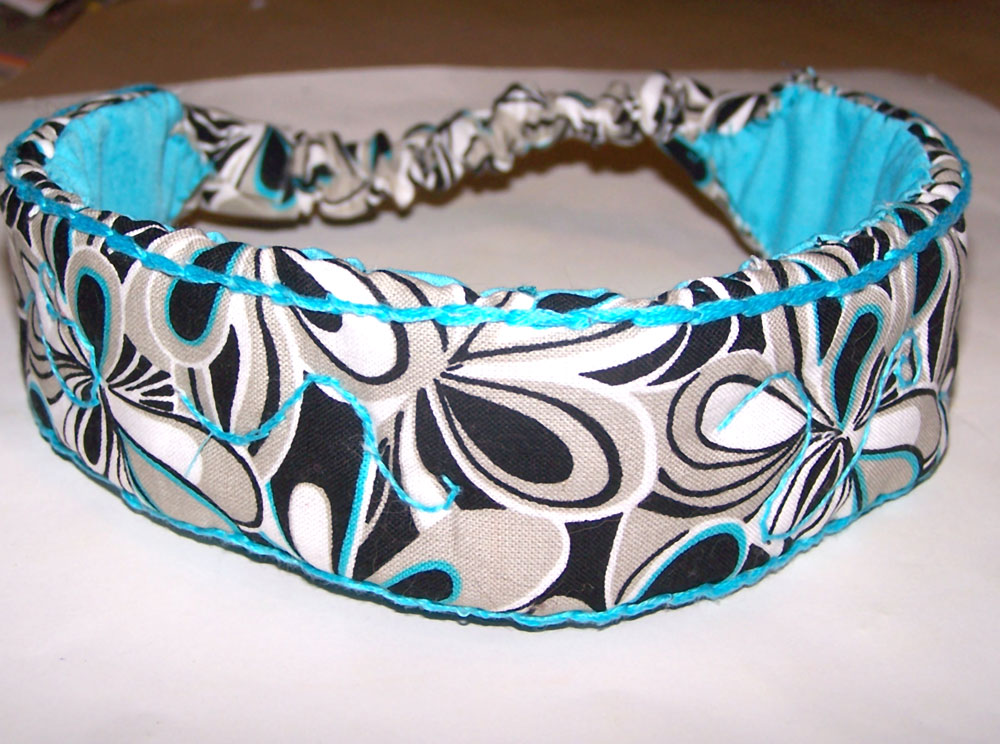
Completed 3 strip quilted and embroidered headband.


Items needed to make the headband:
2 x 1" & 1 x 2"  strip of 22" cotton quilting fabric
1 x 5" strip of 22" cotton towelling or quilt batting
1 x 4" strip of backing fabric about 17" more for larger band
Sewing cotton & needle
3m embroidery floss in colour 1 for border
1m  embroidery floss in colour 2 for crosses
2m embroidery floss in colour 3 for wave
Large eye embroidery needle.
Embroidery hoop  (optional)
20cm 1/2" elastic

Step 1 - Sew the fabrics together

Using sewing cotton sew your strips together horizontally to make the base of the from for the headband making sure to use a good 1/4" seam. The order is 1", 2", 1". It is best to finger press open your seams at this point and steam press the fabric to make it easier to sew your embroidery later.
You should now have one fairly even rectangle or fabric, now cut a 4" section from one end and reserve this for later.

Step 2 - Add the batting- I use towelling, for a cool head in summer I dip it in water before wearing!


Lay down the towelling(or batting) and  place your fabric right side up in the centre as pictured above.
Pin through the middle to secure in place while you work.


Now turn over your work so that it is toweling side up and fold the towelling over itself towards the centre to form the padding like in the picture above.

Step 3 Start Sewing it together


Using the embroidery thread that you have for colour 1 and a big eye embroidery needle, sew right through all of the layers from the front using a stem stitch about 1/4" long along the seam line on either side.

Sew the length of your fabric beginning 1" from the start of the fabric and finishing 1" before the end. Finish with a couple of back stitches. Use the picture above to guide you.

Step 4 - Adding the edging- now it's taking shape!


Fold a hem of fabric over one edge of your toweling and pin.

Sew another line as before, making 2 lines on either side as pictured above.

Repeat with the other side until your piece looks like the picture above.

Step 5 - Personalising your headband....Make it FUNKY


Using colour 2 (for this one I used half yellow and half metallic blue, 3 strand of each) embroidery thread and your big eye sew a pattern on your headband. I used a wave and did it freehand but if that is too scary you can draw it in chalk first or print out a pattern on your computer and sew through the paper to give a clean line.
Make sure that you sew through all the layers for a comfy and good looking head band. Use an embroidery hoop if you like. But most of all, HAVE FUN!

Using colour 3 ( I used lavender with metallic gold, 3 strands of each.

Step 6- Trim

Trim each end to a blunt point as pictured above.

And that is the end of part 1--- stay tuned for part 2

mmmm off to eat the lamb roast my yummy hubby just made me.... bye for now Teesha

Monday, September 27, 2010

Quilted Hair bands

Hi Everyone,

I have finally got around to taking some pics of the hairbands that I have been making  which will be new kits in the store soon.
I use cotton towelling for the batting as I want them to be useful as cool bands in summer and towelling hold water well and is comfortable and not sweaty.

 So far I have 4 variations of the pattern and I am thinking of offering kits for one and three headbands. Each kit will be one of a kind as I am using the strip left over from the fabrics once I have cut them into squares. These strips are between 1.5-2" and work wonderfully for hairbands. Plus I have a patchwork version using 2.5" squares.

The kits will include everything you need to make them including fabric, backing fabric, floss, thread, cotton toweling batting and elastic.

Once I have made up the pattern I will post a version of it for free on the blog as I intend to do for my cushions also.
This one uses 3 strips of tye dye fabric and some fancy metalic floss.
It shows the shape of the hairband before the elastic goes on.


This pic has all 3 that I have made so far.

This one has beads and lots of embroidery.

This is the first one that I made. In these pics, you can see how the elastic attaches


This pic shows ho I stitched in the backing fabric to "cover all the workings"

I hope that you enjoy the headbands and look forward to seeing some as competition entries. They make great Christmas presents too.