
Showing posts with label quilting. Show all posts
Showing posts with label quilting. Show all posts
Wednesday, March 9, 2011
Birch Habby Products soon to be in stock at Craftwerx
Just got approved for an account with Birch Haberdashery and am looking at their huge range to make an order. Is there anything particular that you would like me to look at stocking? I would really appreciate some input.


Sunday, February 27, 2011
New Air Dry Marking Pens
I used to use a chalk pen for all of my marking (which is a lot) and I just kept having to buy more and more chalk and it was annoying having to sharpen the chalk all of the time.
I finally bit the bullet and bought one of these pens that disapear after 24hrs or so and now I am kicking myself that I didn't buy it sooner!
Not only is it great for marking lines to cut but I have also used it to draw out designes to quilt along! My free hand quilting is much better looking now as I can follow line perfectly!
I recommend that every quilter get one of these! It iwll change your quilting life!
I finally bit the bullet and bought one of these pens that disapear after 24hrs or so and now I am kicking myself that I didn't buy it sooner!
Not only is it great for marking lines to cut but I have also used it to draw out designes to quilt along! My free hand quilting is much better looking now as I can follow line perfectly!
I recommend that every quilter get one of these! It iwll change your quilting life!
Thursday, February 17, 2011
Quilting for Queensland- more quilter & knitters needed!
What is Quilting for Queensland?
I started Quilting for Queensland the day after I saw Pictures on the News of the Lokyer Valley.
For me, it was the kids that I saw who have been through so much trauma and who are going to be traumatised again when they finally get home to find everything that is special to them, all their kid stuff- gone or ruined beyond repair.
After some thinking, I started making a kids quilt that I will be sending to Grantham so that at least one child who has lost so much, has something special when they get back home.
I hope that this is the first of many that I will be making.
It is a very simple pattern that I have written and made for my own family made with nice bright fabrics which can be made with or without a name on it.
I know that there are many, many crafty people out there who will feel better about themselves and their contribution simply by sitting in front of the TV sewing a gift for an Aussie Kid who has had a really bad Christmas this year.
So get quilting! Use your favourite bright fabrics and pattern to make the first of many quilts for Queensland! They don't need to be huge full bed size year long projects, just a simple travel or lap quilt of about a meter. Something to say that you care! If you don't have kids fabrics, buy some!
For me, it was the kids that I saw who have been through so much trauma and who are going to be traumatised again when they finally get home to find everything that is special to them, all their kid stuff- gone or ruined beyond repair.
After some thinking, I started making a kids quilt that I will be sending to Grantham so that at least one child who has lost so much, has something special when they get back home.
I hope that this is the first of many that I will be making.
It is a very simple pattern that I have written and made for my own family made with nice bright fabrics which can be made with or without a name on it.
I know that there are many, many crafty people out there who will feel better about themselves and their contribution simply by sitting in front of the TV sewing a gift for an Aussie Kid who has had a really bad Christmas this year.
So get quilting! Use your favourite bright fabrics and pattern to make the first of many quilts for Queensland! They don't need to be huge full bed size year long projects, just a simple travel or lap quilt of about a meter. Something to say that you care! If you don't have kids fabrics, buy some!
Currently we have distribution points for the 100+ people in Grantham and the Lokyer Valley area affected by the floods & Mission Beach for 60+ people in the Tully area affected by Cyclone Yasi.
There are also people in Victoria, Western Australia & South Australia who are also flood affected who we would like to help but as very do not have the quilters.
Currently we have 16 quilters and 2 knitters but we need lots more!
If you don't have any ideas yourself but would like to make a kids quilt for Queensland, send me an email and I will send you details of the "Quilt for Queensland" pack that I have put together for $30.
Profits from the sales of my Quilt for Queensland packs are donated to the Grantham flood appeal and you will have a wonderful simple quilting project to work on that will make a difference!
So I am sending out a challenge-
Make a Quilt for Queensland!
There are also people in Victoria, Western Australia & South Australia who are also flood affected who we would like to help but as very do not have the quilters.
Currently we have 16 quilters and 2 knitters but we need lots more!
If you don't have any ideas yourself but would like to make a kids quilt for Queensland, send me an email and I will send you details of the "Quilt for Queensland" pack that I have put together for $30.
Profits from the sales of my Quilt for Queensland packs are donated to the Grantham flood appeal and you will have a wonderful simple quilting project to work on that will make a difference!
So I am sending out a challenge-
Make a Quilt for Queensland!
Who can join Quilting for Queensland?Anyone who would like to join our group is welcome, you can participate by
a) becoming a liker
b) making quilts or blankets to send to people in Qld who need them
c) purchasing fabric for one of the quilters to make a quilt
d) making a donation for one of the quilters to make a quilt
Currently we have distribution points for the 100+ people in Grantham and the Lokyer Valley area affected by the floods & Mission Beach for 60+ people in the Tully area affected by Cyclone Yasi.
a) becoming a liker
b) making quilts or blankets to send to people in Qld who need them
c) purchasing fabric for one of the quilters to make a quilt
d) making a donation for one of the quilters to make a quilt
Currently we have distribution points for the 100+ people in Grantham and the Lokyer Valley area affected by the floods & Mission Beach for 60+ people in the Tully area affected by Cyclone Yasi.
There are also people in Victoria, Western Australia & South Australia who are also flood affected who we would like to help but as very do not have the quilters.
Currently we have 16 quilters and 2 knitters but we need lots more!
Currently we have 16 quilters and 2 knitters but we need lots more!
I look forward to meeting you and seeing your quilts!
PS: We now have been asked to make quilts for elderly residents of the Lokyer Valley as they are suffering and having a hard time coming to terms with their losses.
PPS- If you have ready made quilts that you can send please email me craftwerxstudio@gmail.com for the address to send them to.
So if you can sew, knitt, crochet, macrame, applique or tatt please join our group!
Saturday, February 12, 2011
Great Quilt Binding Tips- thanks Laura & Marieka!
Laura from the Quilting for Queensland group posted this link to All People Quilt's Binding tutorial.
Binding Tutorial thanks to All People Quilt
It is easy to follow and has a few trick of the trade to make binding that little bit easier.
Marieka also a QFQ member from Bespoke Bites has also given me a great "No Bind" way of finishing quilts that still looks AWSOME.
It is basically to sew the wrong sides together like you would a cushion and leave a gap to turn your quilt through and then just sew up the gap.
The quilt look great and you get away with hours less work.
And for those who don't know what Quilting for Queensland is, we are a group of quilters, knitters & crochetters who are making beautiful quilts for kids and older people from Grantham & the greater Lokyer valley in Queensland who have lost everything in the floods. We have now added Tully and other towns greatly affected by the cyclone.
The quilts are currenlt going directly to Grantham to be distributed by a local volunteer in the town.
If you would like to join in please go to
Quilting for Queensland Group on Facebook
if you are not on Facebook, please let me know and I will create an area here on the blog too.
Cheers for now,
Happy Quilting
Teesha
Binding Tutorial thanks to All People Quilt
It is easy to follow and has a few trick of the trade to make binding that little bit easier.
Marieka also a QFQ member from Bespoke Bites has also given me a great "No Bind" way of finishing quilts that still looks AWSOME.
It is basically to sew the wrong sides together like you would a cushion and leave a gap to turn your quilt through and then just sew up the gap.
The quilt look great and you get away with hours less work.
And for those who don't know what Quilting for Queensland is, we are a group of quilters, knitters & crochetters who are making beautiful quilts for kids and older people from Grantham & the greater Lokyer valley in Queensland who have lost everything in the floods. We have now added Tully and other towns greatly affected by the cyclone.
The quilts are currenlt going directly to Grantham to be distributed by a local volunteer in the town.
If you would like to join in please go to
Quilting for Queensland Group on Facebook
if you are not on Facebook, please let me know and I will create an area here on the blog too.
Cheers for now,
Happy Quilting
Teesha
Tuesday, October 12, 2010
Super easy blocks that look super hard to make!
Hi Everyone,
A lot of people ask for patterns to make using 2.5" squares. Apart from the basic 9 patch block many newcomers to patchwork quilting are a little daunted by all of the fancy blocks.This article is to help with that.
From my own experience and talking to customers I have found that what seems to be the hardest thing for those people new to patchwork is the lingo... and I must admit that I purposely use non-lingo in my patterns so that they are easy for new quilters.
The second hardest thing is finding the "how to make" easy blocks tutorials.
I guess it is because a lot of people make their income with classes, DVDs & Books, so unless you book a course or spend heaps on books and patterns, then find a quilter to decipher the instructions for you, you are left with trial and error.
It is great to see that particularly a lot of younger quilters are taking the pledge to show their process in their blogs and I sincerely hope that this makes it easier.
I have found some utube vids out there and more are becoming available, so my call is for those of you who have been quilting for a long time to share your basic knowledge, either on your blogs or if you don't have a blog perhaps you could ask someone who does to post your instructions.
If fact- I make an offer for anyone who would like to have their techniques on the internet but do not have the time or knowledge necessary to email me and we can work together to put your wisdom here in the Fabric Funhouse.
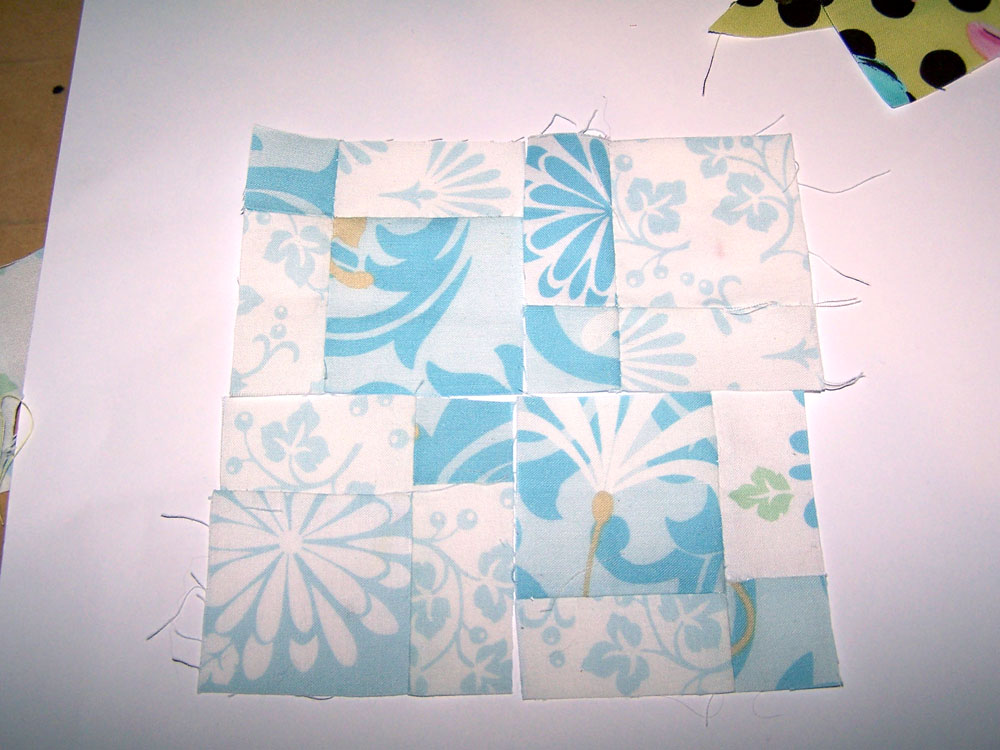
Anyway, enough of that- the following blocks are all made by stitching together 9 squares of fabric and then cutting the block to get the end result.
No stitching tiny pieces, just 9 basic squares in a standard 9 pattern.


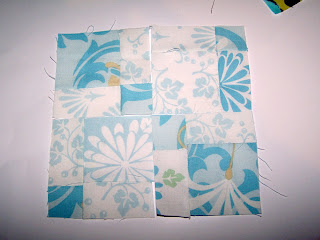


I then went on to make a cushion using only my cut up blocks(I add a few more) in Annabelle by Tina Givens.
It is a 25 square block in the centre cut in 4 to give centre square with full border, with a nine square block cut into strips to give the cross in the centre and another 9 square cut into 4 quarters arrange on the edges.
So far I have added 3 inch strips of lime cushion back fabric to make it bigger. I have bordered the centre square with brown embroidery floss in stem stitch and will take more photos as the project progresses.

I hope that you have found this article helpful and you send me some pics of your marvelous adventurous beginners quilting using these techniques so that I can post them here.
See you soon with a Silly Strips article!
Cheers,
Teesha
A lot of people ask for patterns to make using 2.5" squares. Apart from the basic 9 patch block many newcomers to patchwork quilting are a little daunted by all of the fancy blocks.This article is to help with that.
From my own experience and talking to customers I have found that what seems to be the hardest thing for those people new to patchwork is the lingo... and I must admit that I purposely use non-lingo in my patterns so that they are easy for new quilters.
The second hardest thing is finding the "how to make" easy blocks tutorials.
I guess it is because a lot of people make their income with classes, DVDs & Books, so unless you book a course or spend heaps on books and patterns, then find a quilter to decipher the instructions for you, you are left with trial and error.
It is great to see that particularly a lot of younger quilters are taking the pledge to show their process in their blogs and I sincerely hope that this makes it easier.
I have found some utube vids out there and more are becoming available, so my call is for those of you who have been quilting for a long time to share your basic knowledge, either on your blogs or if you don't have a blog perhaps you could ask someone who does to post your instructions.
If fact- I make an offer for anyone who would like to have their techniques on the internet but do not have the time or knowledge necessary to email me and we can work together to put your wisdom here in the Fabric Funhouse.
Anyway, enough of that- the following blocks are all made by stitching together 9 squares of fabric and then cutting the block to get the end result.
No stitching tiny pieces, just 9 basic squares in a standard 9 pattern.
 |
| cut into 2 diagonally |


 |
| cut into 4 squares |



 |
| cut straight down the middle |

 |
| cut into strips |
 |
| cut into 3rds diagonally |


 |
| These blocks are just a basic 25 square block cut up and rearranged |

 |
| To form a centre square and a border |

 |
| Big, little square centre with 1/2 border |
 |
| reversed |


 |
| centre cross |


I then went on to make a cushion using only my cut up blocks(I add a few more) in Annabelle by Tina Givens.
It is a 25 square block in the centre cut in 4 to give centre square with full border, with a nine square block cut into strips to give the cross in the centre and another 9 square cut into 4 quarters arrange on the edges.
So far I have added 3 inch strips of lime cushion back fabric to make it bigger. I have bordered the centre square with brown embroidery floss in stem stitch and will take more photos as the project progresses.

I hope that you have found this article helpful and you send me some pics of your marvelous adventurous beginners quilting using these techniques so that I can post them here.
See you soon with a Silly Strips article!
Cheers,
Teesha
Saturday, October 2, 2010
Quilted Headband Pattern Pt1
©2010, Craftwerxstudio. This pattern courtesy of http://craftwerxstudio.bogspot.com
You may freely reprint this article on your website or in your newsletter provided this courtesy notice and the author name and URL remain intact.
Free Quilted Headband Pattern Pt1
As promised, here is the pattern for my headbands. As there is a lot to type, I am going to type this over a few different posts.
This pattern is made using 2x 1" strips and 1x 2" strips but there are many variations including using 17 x 2.5" squares, 1 x 2.5" strip and 5 x 1/2" strips.
All Headband kits bought from my eBay store will include the appropriate instructions as well as all of the bits and pieces needed to make the project. Each headband takes about 3 hours to complete including the embroidery so they are a great project for on the bus, in the car or waiting for the kids at sport!
So on to the pattern!
Items needed to make the headband:
2 x 1" & 1 x 2" strip of 22" cotton quilting fabric
1 x 5" strip of 22" cotton towelling or quilt batting
1 x 4" strip of backing fabric about 17" more for larger band
Sewing cotton & needle
3m embroidery floss in colour 1 for border
1m embroidery floss in colour 2 for crosses
2m embroidery floss in colour 3 for wave
Large eye embroidery needle.
Embroidery hoop (optional)
20cm 1/2" elastic
Step 1 - Sew the fabrics together
Using sewing cotton sew your strips together horizontally to make the base of the from for the headband making sure to use a good 1/4" seam. The order is 1", 2", 1". It is best to finger press open your seams at this point and steam press the fabric to make it easier to sew your embroidery later.
You should now have one fairly even rectangle or fabric, now cut a 4" section from one end and reserve this for later.
Step 2 - Add the batting- I use towelling, for a cool head in summer I dip it in water before wearing!

Lay down the towelling(or batting) and place your fabric right side up in the centre as pictured above.
Pin through the middle to secure in place while you work.

Now turn over your work so that it is toweling side up and fold the towelling over itself towards the centre to form the padding like in the picture above.
Step 3 Start Sewing it together

Using the embroidery thread that you have for colour 1 and a big eye embroidery needle, sew right through all of the layers from the front using a stem stitch about 1/4" long along the seam line on either side.
Sew the length of your fabric beginning 1" from the start of the fabric and finishing 1" before the end. Finish with a couple of back stitches. Use the picture above to guide you.
Step 4 - Adding the edging- now it's taking shape!

Fold a hem of fabric over one edge of your toweling and pin.

Sew another line as before, making 2 lines on either side as pictured above.

Repeat with the other side until your piece looks like the picture above.
Step 5 - Personalising your headband....Make it FUNKY


Using colour 2 (for this one I used half yellow and half metallic blue, 3 strand of each) embroidery thread and your big eye sew a pattern on your headband. I used a wave and did it freehand but if that is too scary you can draw it in chalk first or print out a pattern on your computer and sew through the paper to give a clean line.
Make sure that you sew through all the layers for a comfy and good looking head band. Use an embroidery hoop if you like. But most of all, HAVE FUN!
Using colour 3 ( I used lavender with metallic gold, 3 strands of each.
Step 6- Trim

Trim each end to a blunt point as pictured above.
And that is the end of part 1--- stay tuned for part 2
mmmm off to eat the lamb roast my yummy hubby just made me.... bye for now Teesha
You may freely reprint this article on your website or in your newsletter provided this courtesy notice and the author name and URL remain intact.
Free Quilted Headband Pattern Pt1
As promised, here is the pattern for my headbands. As there is a lot to type, I am going to type this over a few different posts.
This pattern is made using 2x 1" strips and 1x 2" strips but there are many variations including using 17 x 2.5" squares, 1 x 2.5" strip and 5 x 1/2" strips.
All Headband kits bought from my eBay store will include the appropriate instructions as well as all of the bits and pieces needed to make the project. Each headband takes about 3 hours to complete including the embroidery so they are a great project for on the bus, in the car or waiting for the kids at sport!
So on to the pattern!
 | |||
| Completed 3 strip quilted and embroidered headband. |

Items needed to make the headband:
2 x 1" & 1 x 2" strip of 22" cotton quilting fabric
1 x 5" strip of 22" cotton towelling or quilt batting
1 x 4" strip of backing fabric about 17" more for larger band
Sewing cotton & needle
3m embroidery floss in colour 1 for border
1m embroidery floss in colour 2 for crosses
2m embroidery floss in colour 3 for wave
Large eye embroidery needle.
Embroidery hoop (optional)
20cm 1/2" elastic
Step 1 - Sew the fabrics together
Using sewing cotton sew your strips together horizontally to make the base of the from for the headband making sure to use a good 1/4" seam. The order is 1", 2", 1". It is best to finger press open your seams at this point and steam press the fabric to make it easier to sew your embroidery later.
You should now have one fairly even rectangle or fabric, now cut a 4" section from one end and reserve this for later.
Step 2 - Add the batting- I use towelling, for a cool head in summer I dip it in water before wearing!

Lay down the towelling(or batting) and place your fabric right side up in the centre as pictured above.
Pin through the middle to secure in place while you work.

Now turn over your work so that it is toweling side up and fold the towelling over itself towards the centre to form the padding like in the picture above.
Step 3 Start Sewing it together

Using the embroidery thread that you have for colour 1 and a big eye embroidery needle, sew right through all of the layers from the front using a stem stitch about 1/4" long along the seam line on either side.
Sew the length of your fabric beginning 1" from the start of the fabric and finishing 1" before the end. Finish with a couple of back stitches. Use the picture above to guide you.
Step 4 - Adding the edging- now it's taking shape!

Fold a hem of fabric over one edge of your toweling and pin.

Sew another line as before, making 2 lines on either side as pictured above.

Repeat with the other side until your piece looks like the picture above.
Step 5 - Personalising your headband....Make it FUNKY


Using colour 2 (for this one I used half yellow and half metallic blue, 3 strand of each) embroidery thread and your big eye sew a pattern on your headband. I used a wave and did it freehand but if that is too scary you can draw it in chalk first or print out a pattern on your computer and sew through the paper to give a clean line.
Make sure that you sew through all the layers for a comfy and good looking head band. Use an embroidery hoop if you like. But most of all, HAVE FUN!
Using colour 3 ( I used lavender with metallic gold, 3 strands of each.
Step 6- Trim

Trim each end to a blunt point as pictured above.
And that is the end of part 1--- stay tuned for part 2
mmmm off to eat the lamb roast my yummy hubby just made me.... bye for now Teesha
Monday, September 27, 2010
Quilted Hair bands
Hi Everyone,
I have finally got around to taking some pics of the hairbands that I have been making which will be new kits in the store soon.
I use cotton towelling for the batting as I want them to be useful as cool bands in summer and towelling hold water well and is comfortable and not sweaty.
So far I have 4 variations of the pattern and I am thinking of offering kits for one and three headbands. Each kit will be one of a kind as I am using the strip left over from the fabrics once I have cut them into squares. These strips are between 1.5-2" and work wonderfully for hairbands. Plus I have a patchwork version using 2.5" squares.
The kits will include everything you need to make them including fabric, backing fabric, floss, thread, cotton toweling batting and elastic.
Once I have made up the pattern I will post a version of it for free on the blog as I intend to do for my cushions also.

I hope that you enjoy the headbands and look forward to seeing some as competition entries. They make great Christmas presents too.
I have finally got around to taking some pics of the hairbands that I have been making which will be new kits in the store soon.
I use cotton towelling for the batting as I want them to be useful as cool bands in summer and towelling hold water well and is comfortable and not sweaty.
So far I have 4 variations of the pattern and I am thinking of offering kits for one and three headbands. Each kit will be one of a kind as I am using the strip left over from the fabrics once I have cut them into squares. These strips are between 1.5-2" and work wonderfully for hairbands. Plus I have a patchwork version using 2.5" squares.
The kits will include everything you need to make them including fabric, backing fabric, floss, thread, cotton toweling batting and elastic.
Once I have made up the pattern I will post a version of it for free on the blog as I intend to do for my cushions also.
 | |||||
This one uses 3 strips of tye dye fabric and some fancy metalic floss.
|

 |
| This pic has all 3 that I have made so far. |

 |
| This one has beads and lots of embroidery. |

 |
| This is the first one that I made. In these pics, you can see how the elastic attaches |
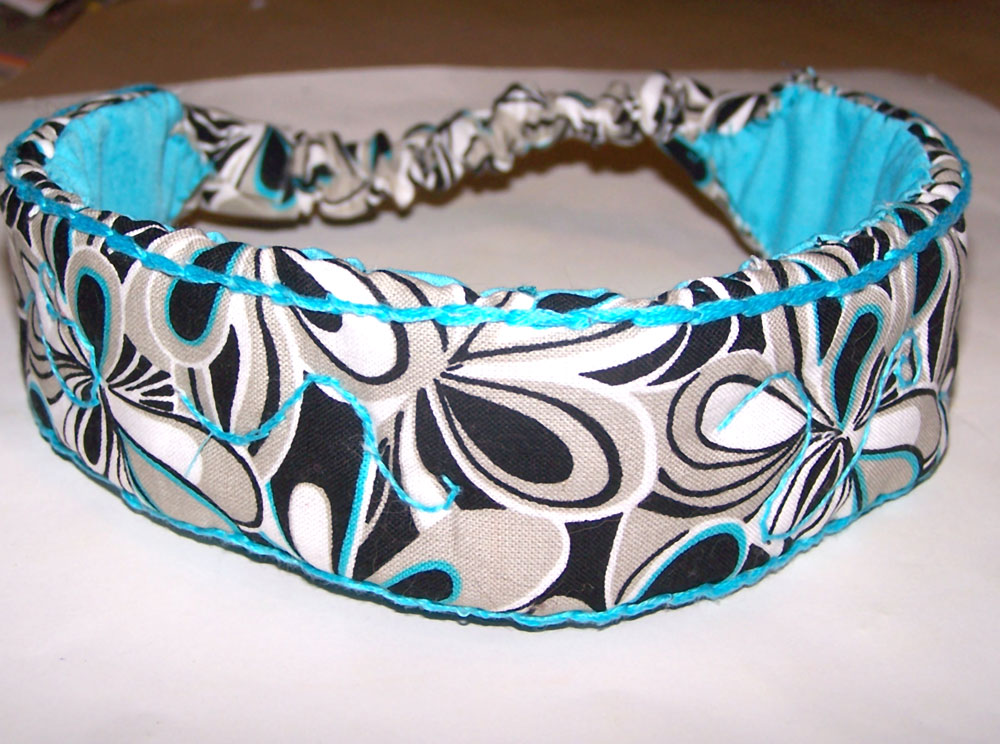

 |
| This pic shows ho I stitched in the backing fabric to "cover all the workings" |

I hope that you enjoy the headbands and look forward to seeing some as competition entries. They make great Christmas presents too.
Subscribe to:
Posts (Atom)